

articles/Nature/tiltandshift
Tilt and Shift
by Paul Gallagher
When I began photography I firstly became obsessed with the black and white images of past masters such as Ansel Adams and Edward Weston. I loved the overwhelming quality, the tonal range in their images and the high detail and definition. I began to study photography at the age of 16 and was employed professionally at the tender age of 18. During my days as a student I used the wonderful Olympus OM20 and exposed the slowest black and white films I could get my hands on, such as Ilford's Pan F and the classic Kodak Technical Pan. I used these films was because I was desperately trying to emulate the tonality and definition the masters and with such a small-format camera and exposing onto a small area of film, grain was a big problem.
Although these films offered some of the qualities I sought, they did not satisfy me enough and having exhausted all the 35mm film options I realised that I had to make a change of camera format. I then made the drastic decision to sell my original set of Beatles' autographs and use the money for my move to medium format, which involved me buying the 'house-brick style' camera, the Mamiya RB67. Although largely regarded as a studio camera and still very popular to this day, it was a move in the right direction. Because of the larger format, I was able to load Ilford Delta 100 film (which is still my film of choice today) and secure the detail of the larger format. The benefits of lugging this monster camera around were evident on my first return to the darkroom. After processing the films I made contact prints and the tonal quality and detail was astounding, resulting in this camera becoming my workhorse for about 10 years.
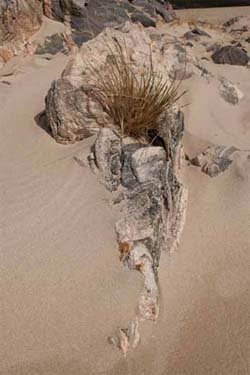
Further along my career path I hit another stumbling block, which was actually a boulder! As many a landscape photographer would say, 'I was in the right location on a remote Scottish beach and the light was truly perfect'. I set up the camera on the tripod, made a meter reading and then stopped the lens down to f32 for full depth of field. After I had processed the films I began seeking this individual frame as it was this one I desperately wanted to see. The results left me livid! Although I had stopped the lens right down, this was not enough and the foreground of the frame was soft. At the time I was lecturing in photography at Southport College and one of my fellow lecturers said, 'Paul, if you want the same depth of field as Adams, buy a large format camera and use the movements.
In particular get to grips with lens tilt.' The phenomenon of lens tilt is what makes many of the classic landscape images look as though you can touch the grass or rocks in the foreground and is known as the Scheimpflug Principle. The principle is named after Austrian army captain, Theodor Scheimpflug, who used it to devise a systematic method for correcting perspective distortion in aerial photographs. The principle works by taking into account that when the lens and image planes are parallel, the depth of field extends between parallel planes on either side of the plane of focus. When the Scheimpflug principle is employed, ie the lens is tilted, the depth of field becomes 'wedge shaped' and therefore the plane of focus is 'stretched', delivering stunning details throughout the image from front to back.

The move to large format was always something I had considered and I was often tempted after experiencing the huge leap in quality from 35mm to 6x7cm. The truth is that this was a very big leap. Although 5x4 gear was easily available, it posed two major problems for me. They were, having to buy all the associated equipment, dark-slides, focusing cloth, and focusing loupe, but even more concerning was the processing equipment such as tanks, a new enlarger and lens!
I did see sense, bit the bullet and acquired the wonderfully-engineered Walker Titan XL and later the Ebony 45SU. With these cameras I settled into a system, a fastidious routine in which everything was controlled by me and my work improved - I was achieving the standards I had always aimed for.
At this stage I was working almost entirely in film but the digital world was leaping forward and I was eventually tempted to move out of the darkroom for my print production and move into the office - by scanning my negatives and printing on Epson large-format printers. This process of large-format camera movements, hand processing films and scanning the negatives for digital output is a great way to work and I have never had detail problems or depth of field issues since.
Along with advances in printing, so has the production of more and more DSLRs and associated, matched lenses. Being predominantly a large- format film photographer I have happily watched as many cameras have been introduced along with newer and more advanced lens technology and always rested with the thought that no combination of DSLR and lens to date can get close to the performance and fine detail offered by my large format camera with movements.
In the past I have tried some of the DSLRs, and although I enjoyed using them and the convenience of the instant preview, which I have never had, they just did not do it for me as a landscape photographer. Several concerns always came to the fore, such as final image-size limitations, noise in the shadows and finally lack of movements, resulting in the loss of foreground definition. This perception was about to suddenly change when I was offered the chance of venturing out onto the Outer Hebrides with a Nikon D3x and the new Nikkor 24mm PC-E shift and tilt lens.

The Nikon D3X is the flagship Nikon DSLR with a 24.5 megapixel FX CMOS sensor and boasts an ISO range of 100 to 1600. The 24mm PC-E lens has an angle of view of 84°, rising to 101° when fully shifted. The shift is available at �11.5mm and the tilt ranges �8.5°. This lens contains 13 elements in 10 groups. It has three ED elements, three aspheric and one with the new Nano Crystal Coat. All I had to do now was get out there and see if all this technology was up to much, and more importantly, could this lens perform the movements and deliver the results that my Schneider lenses could when fitted to my Ebony.
When I arrived on the Isle of Lewis and Harris I ventured out onto the wonderful beaches and deployed the Nikon with the 24mm PC-E as I would have done if using my large format camera. I first noticed the ease at which I could use this lens and how quickly I could obtain focus using its tilt function. There was no doubting the build quality of this lens and it 'felt' well-made and all adjustments were smooth. There was one thing at this stage that I did miss in comparison to my large format camera, and that was the ability to use a focusing loupe as it enables you to closely monitor your focusing on small, individual parts of the ground glass and perfect the focusing process.
The lens is fitted with a locking knob on one side and a 'dial-in' adjustment knob on the other. Both of these functions are easily accessible to the hands when looking through the viewfinder of the camera and avoid the need to take your eyes from the focusing operation. The general focusing operation I followed with this lens is as follows:
1 Compose. Set lens to zero degrees tilt and frame the photograph.
2 Identify. Identify critical nearest and furthest subjects along the subject plane.
3 Focus. Focus at a distance that maximizes near and far subject sharpness in the viewfinder (if far subject is at infinity, this distance will be at or near the hyperfocal distance). Once an approximate distance is identified, twist the focus ring on the lens back and forth slightly to get a better estimate of this distance.
4 Tilt. Very slowly apply lens tilt towards the subject plane (usually tilting downwards) until near and far subject sharpness is maximized in viewfinder. Once an approximate tilt angle is identified, slightly rotate the tilt knob back and forth to get a better estimate of this angle.
5 Refine. Repeat steps (3) and (4) with smaller changes than before to identify whether this improves both near and far subject sharpness; if no further improvement then the focusing procedure is complete. 6 Stop Down. After you have completed the task described above stop the lens down to f11, which I found was more than enough after which you will suffer from diffraction and begin to loose the sharpness you have worked so hard for.

You should be mindful that small changes in tilt lead to large changes in the focus plane angle, and that tilt is correspondingly less influential as the tilt angle increases. The most common mistake I have seen while teaching clients and students large-format camera movements is over estimating the amount of tilt needed. Just dialling in 5 degrees of tilt to get a Scheimpflug effect on a normal landscape is usually far too much and the photographer is left confused and frustrated that their composition has not 'snapped' into pin-sharp focus.
Generally applying the principles I had used for many years made the use of the Nikkor very easy indeed and the overall ease of having the exposure preview available with a histogram was a treat! The real test was the final image. Having made many exposures on my trip and pushing the lens to its limits, when back at home I began to look at the RAW files on my monitor - I was impressed. Although my main concern was the performance of the lens itself, the D3x camera had also performed excellently and I was presented with clean, crisp results which I could easily print up to a size of A2 and beyond, without any loss of quality.
The 24mm PC-E lens stopped to a maximum of f11 offered me some stunning results and when I had had the time to process my black and white sheet films I must confess there was little difference in terms of image sharpness and definition. This did however leave me with something of a conundrum - do I carry on with my large format camera? At this moment there a few reasons that are stopping me. The cost of replacing all my equipment would currently be crippling because I would need the D3x along with a range of lenses as well as the 24mm PC-E, and secondly a scan of my 5x4 negative can easily produce images that can fill a wall and I have printed images in the past up to 5 feet by 7 feet in size! The benefits are the opportunity to have colour and monochrome images from the same capture and the costs of film and processing chemicals soon adds up.
To date I have never been so tempted to move entirely to digital than before and this lens and camera combination certainly have proved tempting. There are other landscape-photographer-friends of mine out there using DSLRs and digital backs on large format cameras (which are ridiculously expensive!) so this will almost certainly be where I will arrive in the future. The one aspect of my photography I would miss is the flexibility of film and chemical processing.
I know for a fact I have made many exhibition prints that could have not been achieved using an entirely digital process, but I am sure technology will remedy this in time. For now I am still content watching the passing of technology, but soon, very soon I will pack away my film processing tanks, throw open the shutters of my darkroom and conduct all of my business from my office. (Blimey! - Ed.)
Users of large-format cameras and those old enough to have used folding 'pocket' cameras will be familiar with the term 'camera movements'. No camera worth its salt (and before about 1930) would have been without a 'rising front', others may also have had swing on the front as well. Such niceties were possible, in part, because of the lack of sophistication of the cameras; the lens was sittingt on a flat bed, with a flexible bellows. With no need for electronic integration of metering, aperture and focus it was far easier to move the lens around and vertical 'verticals' were expected, as a matter of course (no possibility of truing things up in Photoshop in those days and correcting for converging verticals in the darkroom was always difficult).
Image. The present line-up of PC lenses from both Nikon and Canon.
In the digital world of today the only way to approach the flexibility of the cameras that our grandfather's used is to employ a 'Perspective Control' lens (PC Lens) otherwise know as a tilt and shift lens. The main makers have recently introduced additional or brand new PC lenses so that we are blessed with four from Canon and three from Nikon.
They cater for the vast majority of imaging situations in architectural photography and, combined with a DSLR, they can provide superlative image quality that is indistinguishable from work off a 5x4 camera. The most flattering thing that happened recently was a well-respected large-format cityscape photographer assuming that images in my exhibition was made using 5x4, when all the images came from a Nikon D3!
On the opposite and following pages, Paul Gallagher is concentrating on the use of tilt so your editor asked me to concentrate on shift, even though I routinely use both; indeed the 24mm shift lens has become the most-used lens in my kit bag for interior work. Other than the advice Paul is giving, do not forget that shift and tilt are relative to the camera axis, you can turn the camera on its side or even upside down to achieve a 'falling front', 'cross front' or a 'swing front' effect.
It will never be quite as versatile as a fully articulated largeformat camera but will still do 90% of the jobs. The values of movement seem quite small to the uninitiated, but remember a small amount of tilt or shift goes a long way!
The exposure ring-around for the Princes Raod Synagogue at two shift positions.
The images shown here are part of an upcoming book project and were taken using the rising front of a Nikkor 24mm PC lens to effectively double the pixel count of the image, as well as to increase the vertical field of view to take in the ceilings. The agility of modern digital imaging is such that five bracketed exposures were made in the famous Princes Road Synagogue to take in the huge tonal range between the interior and the wonderful rose windows. This gave 10 exposures in all, five without shift and five with upward shift.
The best bits of each exposure were then composited together for the final image. A number of options were tried as part of the stitching including RealViz Stitcher, RealViz HDR, Photoshop HDR, Photoshop Photomerge and using Photoshop to Auto Align then Auto Blend layers for manual masking. In the end the final image was made using Stitcher with a limited amount of masking, dodging and burning, retrieving highlights and shadows in Adobe RAW.

B.P.P.A. LIMITED
The Society of International Nature and Wildlife Photographers (SINWP)
Clwyd Chambers, Clwyd Street, Rhyl, Denbighshire, LL18 3LA, UK
Company Reg 0392 2894 | VAT number 790 4289 05
Tel: 01745 356935
Corporate Partners


Newsletter: Subscribe here
SINWP Bird Photographer of the Year
London Photography & Video Show - Europe's Largest 'All-Welcome' Photographic Convention | Partner Societies | Privacy