

articles/Landscape/thegigapanway
BIG Panoramas made easy - the GigaPan way
by
Every now and again a bit of kit comes into our hands and we say. "Wow, this is a bit special!". Enter the GigaPan Epic Pro. It comes to us courtesy of the Australian magazine Better Digital Camera, for it was they who opened our eyes to the possibilities. We missed a trick to be honest, for we had seen GigaPans before but assumed that the kit would cost thousands. In fact it is a very gulpable £800 or so, the sort of money you might make back with your first commissioned panorama for the right client!
Everything about the GigaPan is epic in proportions: big files, massive scratch files in Photoshop and a bewildering amount of detail with which to wow the viewer. Despite this, it is trivially simple to use; we managed to get it going with out looking at a manual of any description and followed the instructions on the LCD screen. The basis of making a GigaPan is simple: instead of a single, wide-angle shout, you make a mosaic of telephoto shots and stitch the blighters together - hundreds or even thousands of them. Finished pans may be uploaded to the GigaPan website at www.gigapan.org where you can zoom about to your heart's content and also see what others in the community have been up to.
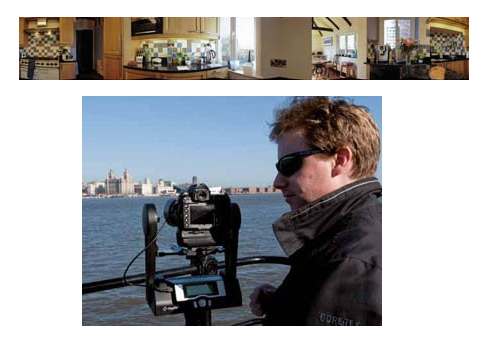
We got our bearings using a 105mm lens but soon expanded our ambitions and set off for the banks of the River Mersey, for a view of the famous Liverpool Waterfront. We shot at a distance of 1,500 yards to the nearest point, 3,500 yards to the edges of the view. For reference, the Liverpool Cathedral was 2,700 yards away. We chose a 300mm f4 Nikkor Apo mounted on a Manfrotto MPRO 535.
At this shooting distance rocksolid mounting is vital and mirror lock-up almost essential; we did not use lock-up and paid the price, a couple of the shots seemed a little wobbly. Also, at this distance, atmospheric haze is an issue and you need a still, clear day.

Setting up consists of mounting the camera and adjusting its position so that the pivot point matches the nodal point of the lens in use. This is tested by rotating the camera from side to side and observing the relative positions of a couple of distant and near objects. When you hit the nodal point (by sliding the camera forwards and backwards) everything stays relatively in place and you are good to go - this is the most difficult thing that you have to do. The GigaPan also has to be levelled using the in-built bubble spirit level - we also employed the Virtual Horizon of our Nikon D700.
With everything squared off, you follow the LCD screen instructions: first locating a horizon at the top and then the bottom of the camera screen (to teach the system the field of view). Then you locate the panorama top-left location and then the bottom-right location, by swinging the camera around. The system then computes how many rows and columns are going to be needed (it uses about 50% overlap) and how long the pan will take to accomplish. You are also warned to lock your zoom, focus, white balance and exposure before you begin.
You can preview your pan at this stage by clicking the controls and the camera is sequentially moved around the scene for you - always a good idea at first as you want to be sure to get everything that you need into the frame.
ABOVE: The Gigapan did a reasonable job of stitching a wide-angle pan of this kitchen but even so, the plug sockets near the centre were compromised.
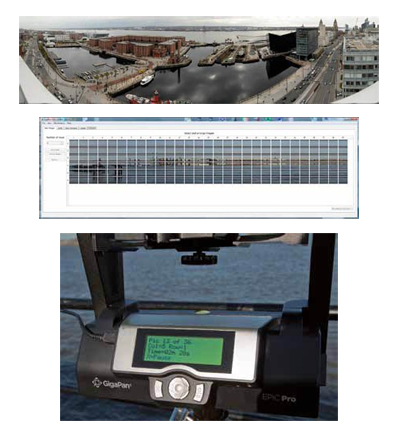
For our waterfront pan we required 29 columns and just six rows, a total of 174 images. We shot at 200 ISO, using 1/160 at f16. This took 16 minutes to execute. Now a lot can happen in 16 minutes and we had to use the 'pause panorama' button to accommodate the arrival of an Irish ferry and the coming and going of the pilot cutter bringing the river pilots back from the bar. We also had to put up with the sun going behind the clouds for a few minutes and variable sunlight sweeping across the scene - you need to keep your wits about you and take the time to look over your shoulder and out across the scene at all times. We shot in JPEG for convenience; you need to ensure that you have enough Flash Card capacity if you are to avoid having to change cards, touching a rig such as this is never a smart move!
Back at base we used GigaPan Stitch to make the panorama. Once you have 'added' the files, you adjust the number of rows until the mosaic falls into place (this was obvious for our view, other scenes might require a little more care). We actually had a rogue duplicate file creep in, which threw the second half of the pan out of kilter - removing this file brought everything back into line. The stitching process took 7m 38s on a 64-bit work-station with 16 GB of RAM. This delivered a TIFF file which was 83,000 by 11,300 pixels weighing in at 2.62 GB. Everything about GigaPans is giga! The file contained a little short of a gigapixel (ie 1,000 megapixels). Opening the file into Photoshop took 31 seconds. Sharpening took 4m 15s. Adding a Levels Adjustment Layer took no time at all and adjustments were almost instantaneous. The demand on computing resources is very high, we were, by now pushing a 23.6 GB scratch file.
In terms of the amount of detail, it is possible to differentiate between men and women from across the river, determine who is in trousers and who is in a skirt, etc. You can also see one person is using their mobile phone. This is the endless fascination about big gigapans and perhaps why they are so popular when you show them to people. Printing them out is for the wealthy only, as this relatively modest offering (by GigaPan standards) was 38 feet long by 6 feet tall.
Other Features
The GigaPan Epic is also versatile. It may be used to create time-lapse images as the on-board processor is connected directly to the camera via a USB lead. You can also shoot bracket exposure sets at each point in the panorama.
Making 360° panoramas is also possible although we tripped up when making a flat pan with a single row of 24mm images; the plug socket in the middle of the pan was misplaced.
The LCD screen of the Gigpan keeps the user informed as to the status of the operation as well as providing the set-up panel.
Encouraged by our initial success we took ourselves off to Liverpool and gained access to the roof top of one of the tall apartment blocks with a commanding view of both the river and the new Liverpool 1 complex. The weather was overcast, but the winds were light. Having to shoot from above head height to clear the balcony rail, Live View came into its own as we could then (just) see what we were doing. This had a rather large drain on the batteries (D700 using eight Duracells) such that by the time we had completed four pans the batteries were ready for replacement.
For the final pan we shot into the city, this time using a 200mm lens for a 192-image stitch, eight rows by 24 columns. Stitching took 8m 40s. The field of view was 142° wide by 30° high. Capture time was 17 minutes. The stitched image was 58,700 x 12,600 pixels.

Two detail clips taken from the panorama above. The pink limousine is barely visible in the panorama! Below this the effect of a bus moving away from traffic lights is to show one solid stationary version and another that is ghosted.
When you look over a completed stitch there are inevitably flaws if, for example, there is moving traffic. In a busy city centre at rush hour this is a problem, but we could have done better by pausing and restarting, synchronised with the traffic lights. Even so we still had a few chopped up pedestrians and ghosts walking about! In terms of repair it is possible to seek out the frame containing the complete vehicle and cloning that back into the stitch. Time consuming, but possible!
Above: Lots can happen in 16 minutes while a pan is being made. Here the Pilot Cutter arrives to disturb the waters!
CONCLUSION
We found only one niggle when using the system, the 'tripod' plate has to be offered at an angle to clear the cleat which eventually locks everything down. This makes it impossible to easily locate a 300mm lens as it fouls the front of the cradle. We had to make do with less than optimum tightness and ended up jamming a piece of foam under the lens, between it and the cradle. Overall though, this is a great piece of kit, very simple to use and effective providing good photographic practice is followed. The results are truly spectacular and even if you do not wish to always make gigapans it is also very effective on smaller projects. The ability to stand away from a camera and let it get on with the job in hand can often be vital both from the point of minimising vibrations but also frees you to keep a weather eye on what is happening around you, and, in crowded locations, politely persuade passers-by to pause for a moment! Worth every penny of the asking price in our view!
See www.gigapan.org for more information
The UK agent is:
360 Tactical VR Ltd : Immersive Imaging Solutions
James Watt Building
Scottish Enterprise Technology Park
East Kilbride, Lanarkshire G75 0QD
Tel: 01355 813375
http://www.360tacticalvr.com/
http://stores.ebay.co.uk/360tacticalvr
Here you will find everything a panmaker can dream off and a bit more!

B.P.P.A. LIMITED
The Society of International Nature and Wildlife Photographers (SINWP)
Clwyd Chambers, Clwyd Street, Rhyl, Denbighshire, LL18 3LA, UK
Company Reg 0392 2894 | VAT number 790 4289 05
Tel: 01745 356935
Corporate Partners


Newsletter: Subscribe here
SINWP Bird Photographer of the Year
London Photography & Video Show - Europe's Largest 'All-Welcome' Photographic Convention | Partner Societies | Privacy