

articles/Lens/shift
The Shift and Tilt Lenses
by Mike McNamee
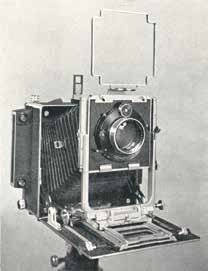
The shift lens is a throwback to days gone by. Older folding cameras had rising fronts to provide shift correction almost as standard. The MPP Field camera, much loved by 5x4 landscape specialists also had tilt and swing on the front standard. The model shown is the 1955 version out of the author's book by George Wakefield. The appearance at the edge of one of the illustrations of a horse and cart indicates just how far back we go by!
The MPP Field camera circa 1955 showing the rising front in operation.
While digital cameras have revolutionised photography, the fundamentals of optics have remained the same.
We move forward now to 1961 when Nikon introduced the first 35mm shift lens, the F3.5 35mm PC Nikkor. It was followed by a 28mm f2.8 in 1968 and then Canon joined the party in 1973 with their TS f2.8 SCC.
Currently there are eight shift and tilt lenses available, three Nikkors, four Canons and the Samyang 24mm (which is available in Nikon, Canon and Sony fits). As with all shift lenses, the Samyang is devoid of auto focus.
Additionally it does not auto-close the aperture and no metadata is available either. So, shift lenses are the province of all-manual operation, which is not too much of a hindrance as their most frequent use does not require any speed or agility. One advantage that the Samyang has over the Nikkor is that it can be rotated into any one of four orientations with tilt remaining available in the same or any other direction (the Nikkor has to be reset by Nikon technicians).

What do TS lenses do?
There are six basic things you can do with tilt-shift:
1. Correct converging verticals (Shift)
2. Panoramic shots (Shift vertically or horizontally effective pixel doubling)
3. Avoiding obstructions or reflections (Shift)
4. Toy town effects (Tilt)
5. Sideways tilt for depth of field changes (Swing)
6. Increasing depth of field in landscape (Tilt usually downward)
Shift
This pushes the lens at right angles to the optical axis. Typically it saves having to 'lean' camera back which creates ugly converging verticals, the shift brings the tops of a building into view while the camera is kept perfectly horizontal. Some users prefer to leave in a little residual convergence as a perfectly straight-sided building tends to look as if it is falling over in the print.
As well as this, shift may be used as a 'pixel doubler'. You take one shot with the shift over one side followed by another with the shift over to the other side. Joining the two images in Photoshop produces a file with almost double the number of real pixels. Shift may also be used to get 'around' objects obstructing the field of view. The classic example of this is shooting a mirror, head-on, without the camera showing in the image.
Tilt
Tilt is complicated. The depth of field is normally spread either side of the focus plane but when tilt is applied the 'volume' in focus changes into a wedge (think if a slice of Wensleydale Grommit!) extending from below the camera and out into the distance. The wedge itself becomes more voluminous if a smaller aperture is used, ie the angle of its faces is spread further apart.

Setting up a T-S lens is slow painstaking work that cannot be rushed. You have to focus manually while watching the image so you need good eyes.
You can, however, use all the assists available which are: a magnifying loupe on the rear LCD screen, a magnifying view finder, or the focus assist light in the viewfinder (providing it can reach to the required area on the outer margins of your image).
An issue with tilt is that if you overdo it the tops of nearby objects can be rendered out of focus (assuming you are tilting down, the most common direction!). It is also true that, if you are standing on high ground, a landscape which is falling below you is also likely to be soft unless you rotate the camera downwards.
The relationship between the camera height and the 'wedge of cheese' is fixed by the optics and can be calculated with precision (see chart). You can approach the overall set-up in three ways: you can calculate your way out of trouble, do it by twiddling knobs while viewing, or you can use a combination of both. Understanding the fundamentals will shorten the time it takes you to get started (and in some instances prevent you from becoming discouraged!).

First Decide on the Optimum Aperture
The usual starting position when using tilt is to gain sharpness right through the scene to be depicted. You have to be tripod mounted anyway, and so exposure time is not an issue. Thus you are free to choose the most effective aperture available. Simply slamming the lens on f22 is not the answer because the effect of diffraction is to degrade the image all over and progressively more once the 'diffraction limiting aperture' has been reached and then exceeded. The limit depends upon the chip size, the chip resolution and the aperture (and little else of consequence).
Technically diffraction limits quality once the, so called, Airy Disk reaches between two and three pixels wide - it is an exactl number so we have chosen to use 2 half pixels for our illustration. The calculations for 'typical' camera are shown in the table. In practice you can vary around the f-number just a little. Going to a smaller aperture will give slightly more depth of field (DoF) with an overall softening; going wider will most likely be using the lens at closer to optimum performance at the expense of DoF.
We are now in a position to think about setting up to shoot a scene but first we practise in the garden. This is recommended for beginners; a windy mountainside might not be conducive to clear thinking!

We took ourselves (me and the test Labrador) off to see Paul Gallagher. Paul has been an advocate of T-S lenses for many years and both writes and teaches on the subject; indeed his company, Aspect2i, run a dedicated Shift-Tilt course (see www.aspect2i.co.uk).
The situation that we set up was on flat ground and so is akin to a maritime scene from water level. Newcomers are usually surprised by how close the near parts of the scene are; they are normally right up to your tripod legs! For starters we calculated and illustrated the scene for a level, landscape-oriented camera, with a 24mm lens, using a 3-ft camera height and an aperture of f13.

The diagram is accurately scaled and shows that the nearest spot on the scene that can be seen by the lens is just four feet away. Additional calculations also show that this is outside the depth of focus for a lens set at the hyperfocal distance. Focussing closer, to capture the near scene, would soften the far distance considerably.
For this reason using the camera with tilt and in portrait mode can grab significantly more into the scene. Accordingly Paul set up his camera lower (2 feet high) in vertical format and set to work. With some help from Chica (see blog on back pages) we set up resolution targets right under the camera and also at a short distance away. As might be expected the tests demonstrated both the limits of untilted lenses and the benefits of tilt.

In the 'scene' image note just how close the test target is. This is almost exactly the same set-up as was used in the main landscape image of Paul's, shot across Kilbrannan Sound towards Arran. For ease of comparison we have cropped and montaged the two parts of the test scene together (and lost the dog) before captioning them with the conditions used for tilt and focus.
As you might expect, the tilt has a significant effect on the sharpness through the image, a result which was never in doubt but the demonstration shows just how close you can image parts of a scene. We repeated the shot sequence using both the Samyang and the Nikkor T-S lenses.

The Nikkor seemed to just have the edge with a detectably smaller amount of residual chromatic aberration. However, there were differences in flare and lighting conditions and these proved to be problematic.
More control would be needed to obtain a definitive answer but at first cut the Samyang is a very creditable performer. At a street price around £899 it represents quite a saving over the big name marques.

This scene has been annotated with circles at the marked angle to the horizontal. Note that with the camera level the middle distance scene is 15° below the feet. However, if you consult the diagram on the previous page you will see that the plane of just acceptable focus is just a degree or so from level.
In these circumstances critical sharpness can only be achieved by rotating the camera downwards and losing a bit of sky. This could be recovered with a small amount of shift.

B.P.P.A. LIMITED
The Society of International Nature and Wildlife Photographers (SINWP)
Clwyd Chambers, Clwyd Street, Rhyl, Denbighshire, LL18 3LA, UK
Company Reg 0392 2894 | VAT number 790 4289 05
Tel: 01745 356935
Corporate Partners


Newsletter: Subscribe here
SINWP Bird Photographer of the Year
London Photography & Video Show - Europe's Largest 'All-Welcome' Photographic Convention | Partner Societies | Privacy