

articles/Nature/reflection-tanks
Reflection Tanks - Two Images for the Price of One
by Mike McNamee

Who doesn't like a bargain, we've all seen BOGOF promotions? So applying the BOGOF philosophy to photography Charles Farnell arps set about constructing a reflection tank to capture that extra image. We showcase few features of a really practical nature and so this one redresses the balance a little, but bear in mind as you read that the methodology explained could easily be translated to child or fairy photography with little more than a change in scale. A tap on the surface of the water would reflect a 'fairy' more realistically than a mirror, although you would have to ensure that electrical safety was given serious consideration.
I had done a fair amount of the usual garden-bird photography over the years but wanted to do something a little different and then it occurred to me that capturing a reflection of my subjects could be what I was looking for. I decided that I didn't want to spend hours lying on the ground next to a pond and in addition I wanted a muted background which was not going to be easy at ground level. This then lead me to think that I needed to raise the whole set-up off the ground to give me the control I needed. After one or two experiments I found a set-up that would produce images to my satisfaction.
Here's how I set about building my rig.
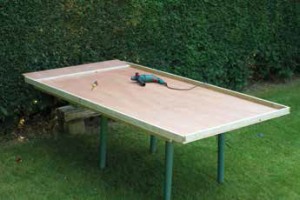
Take a standard sheet of exterior grade ply (8ft x 4ft x10mm) available from most good builder's merchants. Then cut a section measuring 1ft x 4ft and set aside for later. The remaining sheet will now measure 7ft x 4ft. Next fix four roofing battens (40mm x 20mm) around the edge to give maximum depth (see fig 1). The section removed earlier should now be cut to fit and positioned on an angle to provide a sloping shelf (see fig 2). Strengthen the underside by running three or four battens the full length countersinking the screws' heads well into the ply from the top side.
The frame is now ready to be placed on a convenient 'staging'. This could be a set of pallets or suitable table, etc, set at approximately one metre off the ground (see fig 3). Position the tank so that the raised shelf is furthest away from where you will be positioned when taking your images, remembering too which direction the light will be coming from. The next step is to cover the ply sheet with a butyl liner (available from good garden centres). Now is a good time to check the background of your proposed set up and reposition if necessary. Additionally a quick check with a spirit level will give you an indication as to the overall level of your reflection tank which when flooded will need to be as perfectly horizontal as possible. When satisfied with the level, you can start to flood the tank and the fun starts as you attempt to set the assembly into that truly horizontal plane (see fig 4). Adjustments can be made by moving wedges at the necessary corners until the shallow tank is completely flooded and level.
When you are satisfied with the water level you can then consider how you wish to dress the elevated shelf. This will be a personal decision but it is worth considering the time of year, your target subjects and indeed the background. I have found that I prefer to use turf or moss on the shelf. Dead leaves can also be used and work reasonably well but suffer from being loose and tend to be dislodged by birds looking for food underneath, resulting in the liner becoming exposed. Additionally it is important to cover the shelf fully, bringing your chosen dressing material down its full surface and into the water making the join between land and water as natural as possible, avoiding any signs of the liner.
At this point it should be mentioned that in addition to water loss due to evaporation even more tends to be lost by capillary action of the 'dressed ' shelf especially when it is covered with turf or moss. So expect to top up the tank on a regular basis and in warmer weather.
Having completely set up the tank in the correct location, having due regard for the sunlight and background as mentioned earlier, it's time to think about the hide. As the water level in the tank has been set up at approximately a metre off the ground so as to achieve a diffused/blurred background, it will be necessary to erect a platform sufficiently high and distant from the 'dressed' edge of the tank so as to provide a full reflected image of the target subject.
As a guide to getting started, if a seated hide is placed on a raised platform approximately one metre high (see fig 5) and say 12 metres distant from the rear of the tank this should be suitable for any of the crow or dove families. Should you choose to attract smaller birds, say of the thrush family or smaller, then your hide may need to be moved closer and by necessity raised higher. At this point it is a case of trial and error until you find the correct distance for your own particular project. A word about health and safety: if using pallets or the like as a raised platform, do ensure that they are securely fastened together, and that the hide too is in turn also securely fastened to the platform. (I speak here from personal experience!!) As an added bonus, if the hide is securely attached to the platform, it can be left erected for a few days for the birds to get accustomed to it without it being blown away. I choose to use ratchet ties to secure my set-up (see fig5).

With all your hard work complete it's time to start and enjoy the fruits of your labour. Baiting with suitable food for a few days previously is always a good idea, but do consider other opportunities. You will soon find that the water itself becomes an attraction in its self so be ready for those drinking and bathing shots. I have found that many species will use the water for bathing, but pigeons in particular are very keen to use your facilities. However, they do tend to leave a considerable amount of feather dust which will float on the surface and make it look like milk! Keep a piece of wood the same width as the tank to gently sweep the surface clear of leaves and any other bits that will fall in. As an afterthought I mention the weather, the wind can be a nuisance, ruffling the surface preventing a clear reflection. When the temperature drops, the water may freeze, but this may give you just another opportunity and one more dimension to your photography. Thereafter enjoy.

B.P.P.A. LIMITED
The Society of International Nature and Wildlife Photographers (SINWP)
Clwyd Chambers, Clwyd Street, Rhyl, Denbighshire, LL18 3LA, UK
Company Reg 0392 2894 | VAT number 790 4289 05
Tel: 01745 356935
Corporate Partners


Newsletter: Subscribe here
SINWP Bird Photographer of the Year
London Photography & Video Show - Europe's Largest 'All-Welcome' Photographic Convention | Partner Societies | Privacy