

articles/Software/macphun-aurora-hdr-review
Macphun Aurora HDR (and matters HDR)
by Mike McNamee

Reviewing this Macphun software provided the opportunity to consider
and test other aspects of HDR imaging. An HDR (High Dynamic Range)
is a compilation of several different exposures of the same scene to
overcome inherent limitations in the dynamic range of the camera
system. Typically this may be thought of as a dark church interior in
which the windows are illuminated by strong daylight. A single exposure
may be made for the interior or for the windows but cannot encompass
both. In addition to overcoming this issue the HDR images of the past
decade have also provided a certain 'look' to an image, often typified by
exaggerated clouds in the sky or an almost metallic look to portraiture.
This look is not universally popular and is starting to look a little dated.
It has, from the start, been overused in some quarters, to the dismay of
competition judges!
The desire to make HDR images has spawned a software trade in
bespoke applications to make HDR images for although the compositing
of images may be accomplished in Photoshop, it requires a good level
of masking and mask-manipulation skills. Generally the HDR software
will provide pre-sets to achieve a particular look for an image, often
including an option to add glow and/or desaturate an image.
The Bracket Set
All HDR techniques require a number of exposures at different settings
to bracket around the notionally correct exposure. The job can be
accomplished with two, three or five images, sometimes more. The most
common is probably a three-shot bracket at ±2 stops. In a perfect world
the set should be made from a tripod although a high-speed, autobracketed
set of images can be made with correct camera settings. For
example the Nikon DSLRs have a dedicated bracket button which, when
depressed, allows the user to choose both the number of frames and
the exposure intervals between frames by use of the front (sub) and rear
(main) command dials. Additionally the sequence may be altered in the
LCD menu on the back. The Canon system is driven from the LCD menu
and a tad more fiddly. When choosing the method of changing the
exposure it is usually preferable to set the camera to Aperture Priority
mode so that depth of field does not vary and if the subject might move
(eg swaying trees) locking the focus is a good idea. Note that some
cameras provide in-built HDR settings and image manipulation which
is not the subject of this article (you can't shoot Raw files this way and
have a lot less control).
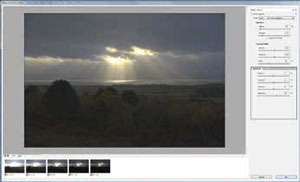
Macphun Aurora Pro
When using this Mac-only software you open the application, load
the requisite images and press the button to make an HDR, it really is
that simple. There are options to Align Images, Ghost Reduction and
Chromatic Aberration Reduction
at the outset and, once the
compilation process is complete,
a mass of other adjustments and
presets appear. And we mean a
mass, there are loads of them!
If that all gets to be too much,
you can go for a preset from the
scrolling window at the base of the
interface although some of them
(most to some eyes!) are a bit kooky.
There are 'natural' settings available
for the less adventurous.
The image set that we tried was challenging, rather too challenging
in fact, and the software struggled to provide a clean rendering of the
colours, inserting heavy green fringes around the sunbeams. Using the
'Landscape' presets produced a riotous green for the foliage on most
settings. The bushes waving in the breeze made ghost removal a task
too far. This particular landscape was better suited to a manual approach
using Photoshop as described later.
The software did create a reasonably attractive Dramatic Monochrome
although there was still some clipping and posterisation in the cloud
fringes. Rendering of three D810 Raw files took 1m 03s.
Photoshop Methods
In Photoshop you can use HDR Pro to merge files automatically. This also
provides a limited number of presets and a modest collection of sliders.
At the extremes, the outcomes can be as garish as those made with
Aurora. The default condition was rather boring and flat, and additional
modifications would certainly be required.
To create an HDR image from a bracketed set, highlight the sequence in
Bridge then click>Tools>Photoshop>Merge to HDR Pro. On our system
it took 1m 20s to collect five Nikon D810 shots together and open the
Merge To HDR Pro dialogue panel. From this panel the Tone and Detail
sliders (Gamma, Exposure and Detail) may be adjusted to achieve the
desired result. In our example, nothing acceptable was generated! Even at
two stops underexposure there was some highlight clipping in the clouds
before the sun. The +2 image was still a little too dark and an adjustment
of +1 stop was required (ie a total of +3 stops). Combined with the -2
image, this gave an effective range of five stops.
Photoshop - The Manual Stitch
None of the automated routines from the Adobe software worked
particularly well and so we resorted to manual stitching. This has the
advantage of leaving the photographer in control of the elements that
are represented in the final blend; one of the issues with landscapes is
the breeze moving trees and bushes so that a combination of five shots is
something of a mish-mash.
The sequence we used is as follows:
- We chose the highest and lowest exposure variants based on the detail in the sky for the low exposure and the bushes for the high exposure.
- Both files were highlighted in Bridge and then we clicked Tools>Photoshop>Load Files into Photoshop Layers. We have put the top layer into 'Difference' mode to highlight the misalignment caused by the use of hand-holding rather than a tripod.
- Select both layers in the Layers palette then click on Edit>Auto Align Layers. This matches the main features including the shore line and bushes.
- We then used the magic wand to select the base area of the dark image to make a sharp, hard-edged mask by clicking the Make a Mask icon with the selection active.
- The mask was then painted upon, freehand at low opacity, to blend the transition across the fields to the bushes in the foreground. The mask may also be adjusted using the Refine Mask Edge tool.
- Finally the Layer mask was selected and blurred to eradicate any unsightly transitions.
Overall
It seems that if you want an 'HDR look' then the better option is to go to a bespoke software such as Aurora or, on the PC, you could usefully look at Photomatix. It was interesting to note when scanning quickly through Martin Evening's book, Photoshop for Photographers our eye was taken by his landscape shot in Glen Etive, in the chapter on HDR, only to find on closer looking that the shot was a manual Photoshop stitch. This is perhaps a valid point, there is often enough flexibility in manually stitching a bracket sequence providing you take the trouble to learn the masking techniques - something you should probably be learning anyway.

B.P.P.A. LIMITED
The Society of International Nature and Wildlife Photographers (SINWP)
Clwyd Chambers, Clwyd Street, Rhyl, Denbighshire, LL18 3LA, UK
Company Reg 0392 2894 | VAT number 790 4289 05
Tel: 01745 356935
Corporate Partners


Newsletter: Subscribe here
SINWP Bird Photographer of the Year
London Photography & Video Show - Europe's Largest 'All-Welcome' Photographic Convention | Partner Societies | Privacy