

articles/Landscape/lightinthelangdale
Light in the Langdales
by Paul Gallagher
Paul Gallagher -Landscape photographer
The cover image from this issue is one of Paul Gallagher's most sublime pieces of landscape and was greatly admired by the visitors at Focus on Imaging, along with some of the most respected landscape photographers around. It was an obvious choice for the front cover of our monochrome special and so we asked Paul to describe its making in detail.
If you want even more inspiration from Paul's work, his recently published book, Aspects of Expression, is available from all good bookshops. To see more of Paul's work visit www.paulgallagher.co.uk.
Ed.
"...forget the tools and think of the tones and if you are connected to your original experience it will soon appear before you..."
As a landscape photographer I gain great pleasure in being out in the wilds and soaking up the elements and the surroundings I am working in. The location is a very important part of this and the Lake District, although somewhat too busy sometimes, is beautiful even when it rains, which is why it has been written about and photographed for many years. After considering the location for a visit, the next thing I do, almost by default, is check the weather.
I do this to avoid days where I know I am going to be drowned by a torrent of rain, but also can gain some understanding of the light.
In my opinion, an understanding of light and how it models and sculpts the landscape it interacts with, is a skill that must be grasped to become consummate at one's craft. When I say this I do not mean that I only go out in fine conditions nor do I mean I go out regardless of the light. I need to have an understanding of where the light will be and what weather it will be pushing through before it hits the ground.
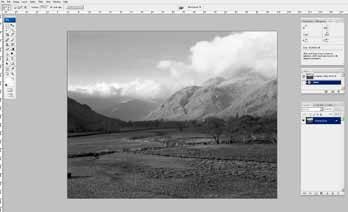
On this particular day I headed into that Lakes knowing that the conditions would be changeable and I was hoping to get some of the best weather for landscape photography, which is being there just before or just after the storm. As I entered the Langdale Valley the sky was mostly bright, with the occasional cloud and it was about 8am. From where the sun was rising this winter morning, I knew that it would never actually get very high in the sky and I would be rewarded most of the day with a low sun the long shadows that help sculpt the landscape.
The vantage point I chose was in the depths of the valley in Great Langdale (grid reference NY308066). I stopped at this point because I could see into the throat of the valley and had an excellent view of the Langdale Pikes to the right, including Harrison Stickle, and Pike o' Stickle and the shadowed flanks of Oak Howe to the left.
I set my camera up literally next to the road and just managed to get the lens to fit over the top of the dry-stone wall. As I set up my Ebony 5x4 I knew instinctively I would fit a standard 150mm Schneider lens which would capture what I had visualised and then I began the wait until the light was exactly what I wanted.
I waited for about 20 minutes and during this time I watched the theatre of light move swiftly over the Langdales and beyond towards Bow Fell in the distance. As a body of cloud parted above, two individual shafts of light introduced the drama of the morning I was waiting for. One shaft of light burst out from behind the clouds illuminating the Langdale Pikes and just touched the slopes of The Band in the distance and a second shaft of light quickly followed bathing the valley floor below me.
I knew in an instant that this was the image I wanted and calculated an exposure of 1 second at f22 with a yellow filter. I fitted the dark slide (loaded with Ilford Delta 100) and quickly made two similar exposures before the moment had passed for good.
Back at home I processed the film in my favourite developer Prescysol EF made by Peter Hogan of www.monochromephotography.com and hung it to dry. I then used my Epson V750 Pro flatbed scanner to produce a scan of the negative. At this stage my aim is to produce a scan that reproduces a fine transition of tones from deep shadow through to the brightest highlights with no tonal distortions. I very often see people during workshops fiddling with the curves and levels in the scanner driver, trying to get it almost all done before the image is delivered to Photoshop. Try to avoid this, as the small scanner preview image is often an inaccurate representation of what you will get when the image arrives in Photoshop.
The first thing I do when I look at the scan is to check that I have all the tones of grey I can work with and I have no blown out highlights or featureless black shadows. Then I begin by cleaning any dust particles off on a duplicate layer using the healing and cloning tools. After this it is wise to consider whether you actually need the full frame of the scan or if you should consider cropping the image to replicate what you visualised at the time. With is image I chose to crop part of the sky because I felt there was too much open grey area at the top of the frame that lent nothing to the composition. Secondly because I was photographing in a farming valley, a cow's bottom was caught in the frame when the light was just right which obviously had to go!
When the preliminary work is done and you are sitting in front of your monitor, it is time to consider how you are going to reproduce what you saw as tones of grey - to revisit the moment again. At this time I often stare at the cleaned scan and try to picture what I saw and felt when I was there. I then begin to decide what working 'zones' I need in the image and how to bring about this change. For this photograph of the Langdale Valley I broke the raw image down into four working zones: the sky, the shadowed hill flanks on the left of the frame, the sunlit Langdale Pikes and finally the sunlit valley floor.
It is important to say at this stage that Photoshop is an amazing piece of software that can perform any single task in 10 different ways! It is also vital to concentrate on the image you are working on, as opposed to trying to be too smart and make the changes in the most complicated way possible. Simplicity is the way! As I often say, when I worked in darkrooms all fine adjustments were made using either circles of card glued to the end of a length of wire or pieces of card with holes cut out of them. After all, if it was good enough for Ansel Adams it is certainly good enough for me.
The tools I use are the lasso tool, set to different feather settings for varying selections, and curves. Each and every curve is applied using an adjustment layer so as not to degrade to original scan file. For this image, the first selection I made was of the upper part of the image including the shadowed flanks of Oak Howe. I applied a curve to this entire area to darken both the sky and sunlit mountain but most importantly return the depth of shadow to Oak Howe. This single selection performed a number of tasks and it is worth bearing in mind that more than one working 'zone' can be tackled at once as opposed to making many fiddly selections, running the risk of your finished image looking like a patchwork quilt.
The second selection was of the valley floor. I used a large feather on this selection as the sunlight did not actually illuminate the tops of the trees and there is a gentle transition into shadow as the valley narrows in the middle of the image. Once again the curve was made with an adjustment layer and I pulled the bottom portion of the curve line to reintroduce the sunlight into the bottom of the image. After this I then 'pegged' back the darker portion of the curve line so as not to weaken the shadows.

The third selection was of the sunlit mountains. The feather was smaller and I did not worry too much about making it very accurate. It often baffles me when I see people struggling to make an exact selection of a sky in a landscape image before applying adjustments. Even if you manage to do it, it often looks false. In my opinion if this is part of your regular practice you need to reconsider exposure at the camera stage of the proceedings. With this selection I applied a curve which accentuated the sunlight and I once again 'pegged' the upper shadow part of the curve line back, gently increasing contrast, with the main adjustment being in the highlights.
With the fourth curve I revisited the sky. I made a selection of the tops of the clouds on the left side of the image and also included the clouds and the tops of the mountains. This may seem unusual to include the tops of the mountains but I believe that if you gradually 'build' the tonality of the image up; the areas where selections are applied will never be seen. With this curve the emphasis was on the darker end of the curve line and the highlights on this occasion were 'pegged' back to retain the brilliance in the white clouds.
This is the difference between simply burning in and applying tonal control, which is much the same as split grade printing in the darkroom. If the sky was just burned in then the highlights would be darkened excessively and the tonal relationships in the sky and the adjustments would be obvious.

The fifth curve was a return to the sunlit mountains. I made a slightly different selection of the mountains once again and applied quite a radical curve adjustment layer to accentuate the sun. I felt confident doing this at this stage because my visualisation of the scene was now coming to life and after building the image up I knew this would represent what I saw.
I applied a very large feather to curve six as I wanted to make a selection across the middle of the valley floor in the foreground. Once again this selection was different from the first I had made of the valley floor and one which only accentuates the light at the foot of the image. The reason I do not simply reopen the same selections from the layers menu is that, once again, the adjustments would be obvious in the finished image and also the different selections are applying slight differences in tonal range.

Finally, the seventh curve of the image was used to slightly lower the values of the clouds hanging over the centre of the valley and the whitest clouds above the Langdale Pikes. I was careful not to include the clear open sky in this selection, as darkening even a small part of this would look ugly. I did not 'peg' back the whites of this curve, as I was happy that these highlights had been slightly subdued and also more features had been introduced to the clouds' structures during the adjustment.
Although this method does not employ a plethora of different tools and drop-down menus, what it does show is that this method is enough to realise my experience and visualisation. It pays to stop and think about what the raw file or scan offers and not to try to get to the finished image quickly. Imagine you are a painter and 'create' what you saw - gradually! Do not feel guilty about reselecting the same area in an image three or four times as each of these adjustments will count towards the finished image. In short, forget the tools and think of the tones and if you are connected to your original experience it will soon appear before you once again.
Aspects of Expression
Paul Gallagher's book was one of the fastest ever selling books on the Hub at Focus. It deals in detail with his working methods along with some very inspirational landscapes.
Paul is running a workshop on landscape photography in Sutherland , Scotland - some of the most inspirational coastline in the UK.

B.P.P.A. LIMITED
The Society of International Nature and Wildlife Photographers (SINWP)
Clwyd Chambers, Clwyd Street, Rhyl, Denbighshire, LL18 3LA, UK
Company Reg 0392 2894 | VAT number 790 4289 05
Tel: 01745 356935
Corporate Partners


Newsletter: Subscribe here
SINWP Bird Photographer of the Year
London Photography & Video Show - Europe's Largest 'All-Welcome' Photographic Convention | Partner Societies | Privacy