

articles/Nature/justwhatisthecorrectexposure
Just what is the correct exposure?
by Ron Thomas
Just what is the correct exposure?
This is a vexed question that crops up frequently and can be the source of conflicting pieces of advice from all quarters. So, just to keep the fire burning, here is Professional Imagemaker's twopence.
The first thing that has to be said is that the correct exposure is the one which delivers, for the photographer, the optimum balance of colour and overall image density. This in itself can be a variable feast and an image situation may call for an adjustment, either global or selective to achieve the photographer's version of the most pleasing result. By this we mean that the photographer is at liberty to take the 'optimum' exposure and then bias it, typical examples being:
A desire to show extra detail in a wedding dress might cause you to darken the dress - an exposure correction.
You may prefer your Caucasian bride to look a little more tanned and so alter the colour temperature - a colour balance correction.
Such 'local' circumstances may not be of any use to a beginner who perhaps has been told by a mentoring panel that their exposures are off but has no clear idea of how to get things back on track. In this situation you need to achieve an optimum exposure before you start to make artistic adjustments. Too many images are too far beyond redemption at the start of the process to need to worry about subtleties of tweaking colour temperature by 100 degrees. There is a wealth of advice out there but much of it is myth, not the least of which is that Photoshop and RAW files can enable you to recover a situation later. Some of the advice centres on the use of a hand-held meter rather than the camera meter. In our experience a well-used camera meter will always outperform a badly used hand held one and a hand spot meter provides inexperienced hands endless ways of getting things hopelessly wrong!
The first big decision is to determine if you are going to expose for an accurate mid-tone grey or try to push your exposure histogram as far to the right as you dare, the so-called ETTR method (expose to the right). The latter is billed as being better because the bit depth is higher for the brighter parts of the image, halving with each successive stop darker. This is a popular misconception that is only partially true. Image density is a logarithmic, not linear, mathematical function and there are sound, science-based reasons why the ETTR method has some flaws (see 'The ETTR Myth' http://www.rags-int-inc.com/).
The thing that everybody agrees on is that over-exposure is bad for digital images and that beyond a certain point no amount of clever mouse clicking in Adobe RAW will recover your detail.
Exposing for the Mid-Tone
A mid-tone grey is a neutral value that has (generally) equal RGB values between 100 and 130 RGB points. Already confusion is building - why is a mid-tone grey not 128R; 128G; 128B? Well the human perception of a grey scale that progresses stepwise from white to black does not fall neatly into the 8-bit (256 units) world that most of Photoshop lives in. The perceived middle tone is less than 128 RGB points.
To add further to the confusion 50% luminance is not regarded by all as the middle of the scale either, and this translates to a logarithmic scale value of around 18% (the so-called 18% grey) but others insist that the value is 13%. It is timely to sort this confusion out, but please do not forget that the difference between a 50% grey and the mathematically correct 51.6% is not actually a major problem; most beginners are further out than such niceties can influence. For the record then, here are some of the values you need to know:
To put some perspective on these data, the variation between different grey cards, 1976 Macbeth Charts and 2007 Macbeth Charts can swallow these variations. Some of the grey cards in our possession are further out than the error corrections we are shooting for; and this is before we start examining the colour temperature of the light we are working in! What we are saying here is that the variations can be quite large; if a grey card looks woefully different to others you have in your possession, it is probably wrong and should be discarded, but that errors in your exposure, day-to-day (and without using targets) are likely to be even larger still.
To put further perspective on this we once tested two identical, top-range lenses which were delivering a whole stop of difference in density even though they both appeared to be working perfectly.
When exposing for the mid-tone, the grey card is set up in the scene and should be standing vertically (or slightly down to prevent it catching and reflecting sunlight) parallel to the camera back and alongside the subject. It should not have any shadows cast upon it, unless the entire scene is in the same shadow and the light should be sufficiently far away that there is no variation in meter reading across the card. Use the spot meter reading of your camera and alter your exposure settings manually until the meter dial or indicators are zeroed.
If you are experimenting with exposures, you might usefully set your camera to bracket the exposure, preferably by 1/3 stop increments, over a two-stop range ie �1 stop, using a total of seven frames. If you bracket using your motordrive this will ensure that there is no variation in sunlight during your exposure sequence, but be on the look-out for it otherwise. The seven shots may then be opened in Adobe Camera RAW and analysed (see later).
Exposing to the Right
Ignoring the warnings about this technique, the method is that you keep shooting, using manual exposure settings, and increase the exposure until the highlight flasher starts to indicate that some part of the image is over-exposed. You then back the exposure down by 1/3 stop and that exposure will ensure that none of your image-channels (red, green or blue) is 'clipped'. If you find that the highlight of the image is so bright that you have to reduce your exposure so far that the rest of the image looks too dark then you are in trouble with the dynamic range of the scene.
Your options then are to shoot a series of exposures and use Photoshop to mix together the best bits of the bracketed set, or evenup the lighting by injecting supplementary, fill-in light, usually with a flash light of some description. Be aware that you have little choice in this matter, there is no real way of increasing the dynamic range of the camera other than the special chip types used by the Fuji Fine Pix SLRs. Often a better choice is simply to move your subject out of the strong light, into something a little more forgiving, like the shade of a building. Note, if you do this your colour temperature will now be far higher, as your new 'shadowed' area is lit by blue sky.

There are issues with using clipping as an indicator of exposure as you never know, until you measure it, what RGB value the camera flashes 'clipping' at, and it is unlikely to be 254 RGB points, (which it is in Photoshop). Additionally the clipping measurement is based and shown on an sRGB, proxy, JPEG image on the back of the camera and might not truly reflect what a RAW file can do. The same slight reservations apply to using the histogram on the back of the camera. Having said all that, using the highlight flasher or the histogram is always better than trusting to the camera's program mode!
When the dynamic range is too high and you cannot do anything about it, the concept of optimum exposure flies out of the window (Peter Pan's not Bill Gates' window). Typical of this situation is a bright, sunlit landscape. You cannot possibly throw in some fill-in flash to level up the shadows to the highlights. This is why High Dynamic Range (HDR) routines were invented and are popular; they are the only trick left in the pack. If it has to be a single exposure for such a scene then you should err on the side of under-exposing as you can never recover total burnout, but you can deal to some extent with the noise introduced in the shadows of an underexposed scene.
Recognise though that you may have to compromise some quality aspects in order to obtain the best balance of image quality.
Putting Numbers to it
As you will by now have come to realise we like to put numerical values to our deliberations, if only to cut through the bullshit we often have to endure on the forums about various matters (sharpening, noise reduction, exposure and 'which camera?' being highest on the list). The test methods are quite simple, although you do need to think all the time and work methodically towards your goal of a 'perfect' exposure.
We started by looking at our available grey scales and patches but even before that we checked our measuring instruments against each other.
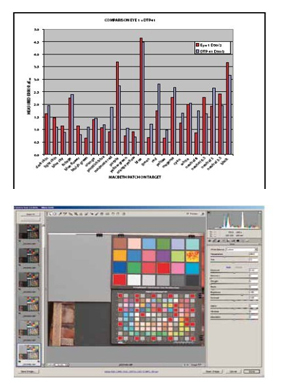
The repeatability of a reading off the spectro was within � 0.09% (95% confidence). The difference between a DTP41 and X-Rite Eye 1 was 0.04% of the target luminance (see also the graph on the right). The nearest value to 50% luminance was Johnstone's dark-grey paint! The various Macbeth Charts ranged from 49.29% to 51.76% luminance. The various grey cards were only within � 0.5% of 50% grey. One of the grey cards was about 4 ?E Lab away from the 'target' value because it was very warm coloured (and part of a defective batch). There are differences between the data used to calibrate using a Macbeth Chart and the actual values of an individual Macbeth Chart.
Assuming that you are not in possession of a defective grey card or Macbeth Chart, there is no point in worrying over much about RGB luminance differences of 5 points, there is more variation than that between individual charts! However, a 5 RGB point shift away from neutrality will be readily detected by eye, colour bias is slightly more important than a density shift in a neutral grey.
In summary then we are confident that our measurements are good, we have screened out defective grey targets and we are now ready to examine the errors induced by camera exposure variations in a meaningful way.
The Camera Tests
It was decided to calibrate and test in the field, but we tested (a Nikon D200) at home to iron out any wrinkles in the method. A set of targets was shot in low afternoon sun with actual exposures confined to brief intervals when the sun was obscured behind light clouds. A seven-shot bracket was collected, centred around the base exposure determined by a spot meter reading, using the camera meter and grey card #1. The light level was measured at 6,800 lux equivalent to a required exposure setting of 1/125 f5.6 at 200 ISO, something like two whole stops away from a noon sunny, summer day.
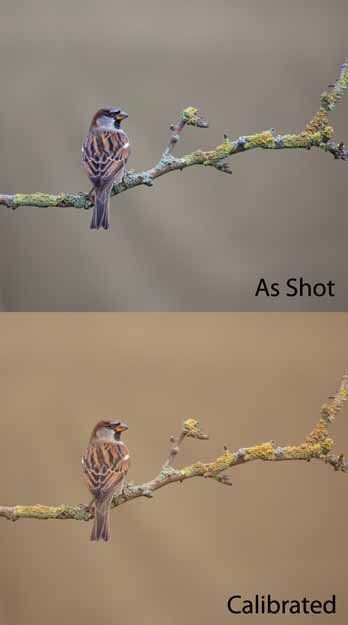
The target images were then taken into Camera RAW and corrected only for white balance, a shift from the camera setting of 5,500°K/ -7 tint to 4,900°K/ -3 tint (we, incorrectly, judged the setting as 'cloudy'). The Rags Gardner 'Read ColorChecker' script was then employed to assess the overall errors in the Macbeth Chart at each exposure condition, and this was then used to create the graphs.
In Photoshop, the ACR highlight clipping became active for all the whites around the Macbeth SG Chart at +2/3 of a stop and another 15 patches started to 'alert' at +1 stop (the purer yellows and all the pastel shades). In other words, our assessment of the correct mid-tone exposure was almost exactly correct (certainly within 1/10 of a stop) using the spot metering of the camera and this assessment is backed up by the plot of the errors which bottoms out a tiny fraction to the underexpose side of our assessment in-camera.
The graph also shows what can be achieved with calibration using the Rags Gardner script. Using ACR Calibrator, the error is reduced to 50% of the uncalibrated value, a result which duplicates our previous findings.
The second graph might require some interpretation: the errors are accelerating away faster on the over-exposure side (ie the curve is steepening faster because the errors are increasing at a faster rate). In layman's terms there is less exposure latitude for over-exposure. The errors in the colours are due to them becoming washed out (ie less saturated) as they become too light.
The results are the ones we expected (we have done this experiment a number of times now!) but the message remains the same, you overexpose at your peril. RAW files will allow you to recover over-exposure of 2/3 stop quite easily but if you pile an overexposure of 2/3 on top of a misjudged mid-tone reading you might have unrecoverable loss of highlight detail.
The majority of the errors introduced over a � 1 stop range are in the image luminance (ie it is too light or too dark). The error values are quite large. In a situation in which 4.0 ?E00 is a reasonable result and 2.0 ?E00 can be achieved with a bit of care, the error for a stop over or under is eight times the best value on the over-exposure side and seven times the value on the under-exposure side. However, much of this can be recovered in ACR. Adjusting the RAW files by hand we achieved the following:
These values are adequate for most purposes and involved only adjusting the light balance, exposure, brightness and contrast. The task is made possible because we could watch the Macbeth Chart values changing and we know the target values. To make corrections without the assistance of a target is pure guesswork and will result in inconsistent results from shoot to shoot.
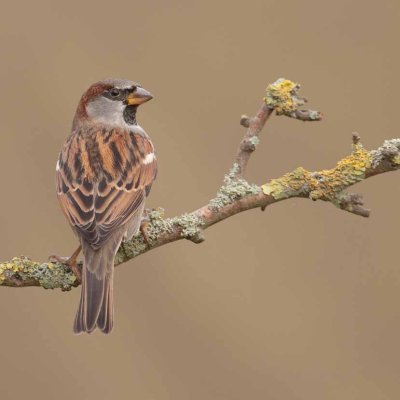
It was always our intention to repeat these tests on different cameras and in the field, and so the team duly assembled at a site on the banks of the River Dee at a bird hide, complete with baited perches to bring our feathered friends into the range of a pair of Canon cameras equipped with long lenses (Canon 50D/400mm lens and Canon 5D MkII/500mm lens). The day was dull and overcast with low-level cloud.
Despite this the correct mid-tone exposure was already blowing out the sky to such an extent that no recovery in Camera RAW was possible. Even with -4 stops on the exposure slider and 100% on the recovery slider, the sky was still predominantly clipped above 255 RGB points.
We placed the target to one side of the perches so that occasional calibration shots could be made but for the remaining time we used Auto White balance and aperture priority settings to explore the scenebiased values. AWB was quite poor, as the composite image shows, the camera-assessed 4,200°K/ +1 tint but really required 5,500°K/ +5 tint. This is subject failure, not a Canon-based flaw; the Photoshop auto white balance was very similar.
It ably demonstrates the advantage of having some form of calibration target available in the same light as the subject. We found that the birds were disturbed by the Macbeth Chart and eventually removed it from the scene. However, as we showed with our analysis of the grey patches, a small piece of wood painted in Johnstones dark grey might be very serviceable and dispensable (and unlikely to scare the birds!).
Allowing the camera to decide the exposure (using aperture priority mode) caused variations in exposure from 1/125 to 1/250, a whole stop, in spite of the fact that the ambient light did not change (as confirmed by occasional measurements of the grey card). In the 75 frames exposed, the distribution of exposures was as follows:
So there is a whole stop of variation even though the ambient light did not change a jot, the spot meter was sometimes on the backdrop sometimes on a bird, and so on. In terms of balancing a set of images a set, manual reading would have simplified the down stream workflow considerably.
Overall, our experience with the two Canon DSLRs indicated that the 50D was absolutely accurate on spot-metered exposure, and the 5D was within 1/10 of a stop. The progression of error improvement using various workflows is as follows (values in ?E00):
The table indicates that correcting for the camera (the Camera Calibration tab) has a slightly larger influence than just tweaking the colour balance and exposure (for an exposure that is reasonably close to correct). It is important to emphasise that this is for colourmetrically accurate rendering of a scene and that you may still prefer a modified setting. For the cameras tested the effect of calibration was to reduce the colour saturation of the target; as shot and uncalibrated the cameras increased the saturation. There are other options available via the latest versions of Adobe Camera RAW and these carry names such as faithful, neutral, landscape and portrait. We analyse those as part of the D5 review. When they are applied they do not reveal the underlying slider settings.

B.P.P.A. LIMITED
The Society of International Nature and Wildlife Photographers (SINWP)
Clwyd Chambers, Clwyd Street, Rhyl, Denbighshire, LL18 3LA, UK
Company Reg 0392 2894 | VAT number 790 4289 05
Tel: 01745 356935
Corporate Partners


Newsletter: Subscribe here
SINWP Bird Photographer of the Year
London Photography & Video Show - Europe's Largest 'All-Welcome' Photographic Convention | Partner Societies | Privacy