

articles/Nature/getdownwithwildlife
Get Down With Wildlife
by Andy Astbury

Let's face it, as 'homo sapiens' we do tend to view everything in the world from our somewhat elevated point of view. When we shoot a wedding or other social event, we do so standing up because we photograph our clients from 'eye level' - after all, we don't want to be taking shots up the bride's nose do we? Similarly, when our clients are sitting for a photograph we either kneel for the shot or use a waist-level viewfinder in order to obtain that eye-level Point of View (PoV).
I had a bit of a wry smile the other day when I popped into a friend's studio - he was 'jacking up' a light table with Peli cases because he was photographing some jewellery for a catalogue, and he was dammed if he was going to bend his back to do it!
But when it comes to photographing wildlife, one of the commonest faults I see in images is that they are taken 'looking down' on the subject - why do photographers do this when they know 'the rules'? Well it might be because getting down for an eye-level PoV on wildlife usually involves getting dirty, or wet, or bitten by bugs, or scratched and stung by brambles and nettles - or any combination of the above, or sometimes even all of them!
But if you want to shoot seriously creative images of wildlife this is something that you are going to have to accept, as the eye-level rule always applies and most wildlife has eyes somewhat closer to the ground than ours!
There's one other great advantage to getting a low PoV on wildlife - the background usually becomes a bit more manageable. Visually it will be somewhat easier to isolate your subject from the background with creative use of depth of field - another key to a successful image.
There's one other great advantage to getting a low PoV on wildlife - the background usually becomes a bit more manageable. Visually it will be somewhat easier to isolate your subject from the background with creative use of depth of field - another key to a successful image.
And so what I'd like to do in this article is to show you a few ways of getting this super-low PoV and illustrate how it helps get the creativity flowing.
Equipment
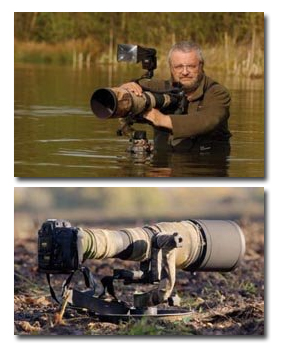
For the great majority of my shots, be they with a super-tele or a macro lens, I always use the same tripod - an old Gitzo 1548. I use this because it has no centre column, so its legs can be spread flat to the floor if needed, and it provides very solid support for my equipment. It's not without its faults, especially if I stand it in deep water (of which, more later) but it does the job I want it to do and you can't ask for more than that
If I'm working on a freshly sown field, or on the beach, I'll quite often switch from the tripod to my home-made 'ground pod'. This spreads the weight of the camera and lens, a bit like a 'snow shoe' and so I can push the set-up in front of me, as I move forward, without it digging into the ground as it would with a tripod.
If I'm photographing water birds and want to remain a bit more mobile than a static tripod would allow, then I will revert to a floating hide set-up which enables me to get spectacularly low PoV shots and, with careful use, some fantastically close shots too.
Lastly, possibly the most useful and cheap support solution for low PoV work is the humble bean bag; a couple of these is are worth the relatively miniscule investment they command and will serve you well in all sorts of situations - until you lose them, like I'm always doing! They are really useful for getting into 'tight' situations quickly.
The Benefit of Getting Low
As I mentioned before, other than the image looking more natural, the big benefit of the low PoV in wildlife photography is the ability to control the background and isolate the subject - the cornerstone of creativity, concentrating the viewer's eye on the subject and the creative composition you've crafted so well. Doing this is vital,as without control over the background it becomes too sharply defined,and its tonal and colour detail begin to compete for the viewer's attention and 'drag' their eye away from the subject.
Shooting at a steep angle usually means we are shooting the ground or water surface that our subject is on - the far limit of our depth of field will then be working against us, as the camera-to-subject and camera-to-background distances are pretty much the same. However, if we get down to our subject's eye level we stand a much better chance of creating a greater camera-to-background distance simply because we are now placing the lens axis parallel with the surface that our subject is on.
Chances are now that the camera-to -background distance has increased dramatically and the backdrop will now be much less well defined in tonal and colour variation. This effect can now, perhaps, be amplified by making a slight change in our shooting position.
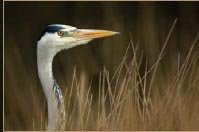
The heron portrait was shot with the camera on the tripod in around three feet of rather chilly water! I was actually shooting Canada geese portraits at the time - I get them to gather around me by flicking little pieces of wholemeal bread onto the water.
If you are in the water, as opposed to on the edge or bank, you'll be surprised by how much your 'perceived threat rating' goes down, and they very quickly learn to regard you as a free meal ticket!
Anyway, I was aware of this heron's presence and that it was working its way slowly through the reed margins, looking for tasty morsels. Even though, at the time, it was too far away to photograph with the 800mm lens, I was quite surprised that it had not noticed me.
So, much to the disdain of the geese, I stopped feeding them and gently slid back behind the camera, hoping that the geese would stay calm and not disturb the heron.
There was one spot that the heron was heading for which was about the right distance for me to get this framing and, at the same time, giving me a great background. Sure enough, after a couple of minutes wait, the heron stepped into just the right place and I got the shot I was seeking.
The only problem with using a tripod set-up in water is that of moving about - even changing position by just a few feet is fraught with danger and just one slip can send everything into the water. So when I know I'm going to be moving around in the water margins I switch to a floating hide.
A floating hide, or 'blind', allows me to get shots that, frankly, I would find near impossible by any other method. It gives me the ability to have the lens just a few inches above the water while allowing me to freely move about without attracting the attention of my subject - something which a tripod set-up does not allow. It does have its limits though, the main one being that it can't be used on anything other than calm water, as you cannot stop it from bobbing up and down on anything but the smallest of wavelets.
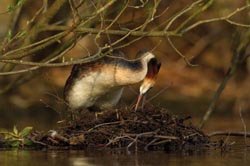
I've tried to get this shot from the bank on many occasions without success, but using the floating hide, once the situation presented itself, the shot was done within a couple of hours.
Prior to the chicks hatching I managed to get some quite nice images of the female tending to the nest. The nest was in a very awkward position, under low, overhanging branches and there was no other angle to photograph from, so the background was something I could do little about - but it was a privilege to photograph this spectacular bird at such close quarters.
To attempt this without a floating hide would have been impossible and potentially detrimental to the bird and the eggs in the nest. Unhidden, my presence would have caused totally unacceptable disturbance to the bird but, as you can see from her actions in the shot, she is totally unfazed by the proximity of the hide.
The secret is to move in VERY slowly, take the shots quietly, and then to move VERY slowly out again, facing the subject all the time, watching it closely and being ready to stop should the bird begin to pay you any attention.
Another hard-to-get image, without the floating hide, this moorhen would not be prepared to allow so much intrusion into its 'comfort zone', let alone be relaxed enough to take a bath!
Again, not the best background bokeh* in the world but it does show the benefits of getting the eye-level shot - this time together with the prudent use of some balanced fill-flash to counteract some rather harsh lighting.
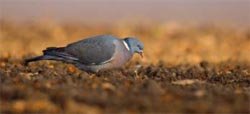
This next shot, of a wood pigeon, is a good example of a ground pod getting you in the correct position. There is a row of beech trees in a local field that in the autumn drop an awful lot of beech mast - something that all wood-pigeon adore. The problem is that the row of trees is in the middle of a field, not at the edge, so the only option was to crawl into position very slowly.
The surface soil was very soft and trying to slide a flat tripod across it would be impossible - the ground pod rides across the soft surface and so does the job very well. An even cheaper and quicker fix to the problem would be bean bags on an old cooking tray - I've done that before now!
Stay Low for Macro
All that has been discussed up until now is no different with macro. These images rarely look good unless the background is 'clean' and free from visual clutter and, unless you are at eye level with your macro subject, you also have problems with depth of field run-out, resulting in either the front or back of the subject being soft and out of focus.
And that doesn't just apply to insects either whether photographing fungi in the autumn or bluebells in the spring you'll obtain far more striking images if you adopt a low point of view and get control of the background. Getting control of the background is perhaps the biggest defining asset you can bring to bear on your images.
Eliminating background definition adds depth to your images. If you have the chance to choose a background that is tonally even, and of an overall complementary colour to your subject, then you'll have all the ingredients you need to isolate your subject from its background in your final image.
Quite often I find myself not bothering to take shots of a particular subject simply because when I analyse the particular situation I can see that I can't obtain a good, controlled background AND a good angle on the subject. And the simplest key to getting control of the background is getting that eye-level LOW Point of View.
Andy Astbury
Andy Astbury is a full-time photographer and videographer.
He qualified from Cheshire School of Art in 1978 and now specialises in wildlife photography, stock work and teaching. He leads courses as far away as Ecuador, but for closer to home, he also teaches from the Bob Rigby Photographic company, based in Bollington, Cheshire. Details of his courses may be found at the web addresses listed below.
Andy is also available to lead bespoke field courses so that small numbers of aspiring nature photographers can get guided hands-on experience in the wild. We are hoping to showcase more of his work in a later issue of Professional Imagemaker.
Wildlife in Pixels - Still & Video Images of the Natural World
http://wildlifeinpixels.com
andy@wildlifeinpixels.com
www.bobrigby.com

B.P.P.A. LIMITED
The Society of International Nature and Wildlife Photographers (SINWP)
Clwyd Chambers, Clwyd Street, Rhyl, Denbighshire, LL18 3LA, UK
Company Reg 0392 2894 | VAT number 790 4289 05
Tel: 01745 356935
Corporate Partners


Newsletter: Subscribe here
SINWP Bird Photographer of the Year
London Photography & Video Show - Europe's Largest 'All-Welcome' Photographic Convention | Partner Societies | Privacy