

articles/Nature/birdsinthegarden
Photographing Birds in the Garden
by Jon Ashton
Looks At Some R&R In The Open Air!
Hide or blind photography can be a most relaxing and rewarding form of natural history photography. It offers some choices, and presents you with the possibility of having some control over circumstances, a rare occurrence in the world of natural history photography. The hide offers an opportunity to enter the 'circle of fear' that all wild animals have;
more importantly, it offers this opportunity without it being at the animal's expense. Hides range from permanent, wooden structures, such as those at nature reserves, to small, portable versions that may be worn like an overcoat. This article is directed primarily at bird photography either in the garden or perhaps in some local, safe area adjacent to a wood or copse, using a portable hide in the form of a tent.
The advice offered is based upon personal experience, there is no single, prescriptive method that must be adhered to, but if you follow the guidelines I offer, then I promise, you will be rewarded with some satisfying images. All good nature photographers must adopt an ethical approach to the needs and welfare of their subject and the following points should be considered as mandatory:
Everyone who enjoys birds and birding must always respect wildlife, its environment, and the rights of others. In any conflict of interest between birds and photographers, the welfare of the birds and their environment comes first. Learn patterns of animal behaviour - know when not to interfere with animals' life habits.
My approach to photography is to keep things simple and to work along with nature, rather than trying to overcome or fight it. The hide or blind can be placed in a position of your choice and perches equally so, though we will appreciate later in the article that certain choices have to be made to ensure optimal results.
There are a number of suppliers who provide commercially prepared hides in different sizes and offering varying degrees of portability. I use an Ameristep Doghouse Blind; this is camouflaged and is big enough for two people, plus gear. It has apertures on three sides and offers Velcro scrim-netting to ensure the birds cannot see into the hide; in addition, the interior of the hide is jet black. The hide can be erected and pegged down in a matter of five minutes or less. This convenience comes at a price, but I have used the hide regularly now for several years and it has served me well.
If you do not wish to invest a great deal of money in purchasing a hide it is also worthwhile considering something as simple as camouflage netting, which may, for example, be placed over a fence or between a couple of posts or indeed, as I have done, across a garden trellis. Certain fishermen's tents may also be suitable; it is worthwhile looking at a number of wildlife and fishing websites to appreciate the range of h des available and their costs.

Location Location
There are several considerations to keep in mind before deciding upon a location for the hide. The following will help reduce the requirement for additional apparatus and also reduce subsequent time spent on the computer:
The time of day you will be using the hide
The position in relation to hedges and trees
The position of the sun
The background
Any garden 'traffic'
If you intend to use the hide during the morning, for example, you may find that the sun is not ideally positioned in relation to your surroundings. Ideally the sun should be shining directly onto the subject and it should not produce strong highlights in the background. Sometimes a slight degree of back-lighting can be attractive. Beware that strong side-lighting can lead to dark shadows and a loss of plumage detail. Placing the hide reasonably close to a hedge or bushes will give the birds a sense of security - you will notice that they are happy to dart in and out to the feeder(s). Lastly ensure the hide is located in a position where the rest of the family will not be continually walking by, or worse still where someone might steal it.
Now we come to the bit where we get to work with, as to opposed against, nature. The hide will provide you with some degree of comfort: protecting you from the elements, concealing you from sight and offering you the opportunity to make yourself at home. Depending upon where your hide is going to be located, and indeed for how long, will determine how much effort it is worth investing. For periods of weeks or on very wet ground you may wish to consider placing something like duck boards in the hide.
This will keep your feet from being in the mud and help keep them stay a little warmer (assuming it is winter). You will need a seat or stool in the hide and again a firm grounding footage, or base, will prevent the legs from sinking in to the ground. A flask of tea or coffee, maybe some sandwiches or biscuits will also be very beneficial. I do not usually take a book with me - it is inevitable that something will happen when my nose is buried in the text! You will find there are flurries of activity followed by eriods of inactivity; I use this time for a little careful chimping - this helps reduce time editing and comparing images back home on the computer.
I would stress, however, that I only delete images that are obviously unsharp or where the bird is not in the frame, if there is doubt over whether the image is usable or not then I would leave it and make that decision on the computer.

Clothing
Ensure your clothing is adequate, hides can be both cold and hot - too many layers are better than too few, and of course dark, muted colours are preferred. It is a good idea to wear a beanie hat, or something similar, especially if you are thin on top - 35% of heat loss comes from the head! The beanie does not have a peak and so does not keep catching on the camera (I find baseball caps very irritating as the peak knocks the camera and I am for ever turning the hat round this way and that).
A pair of dark gloves may prove beneficial; this is not only for warmth but to keep the hands camouflaged, should you have to move them outside of the hide; equally importantly it ensures no movement in the hide can be seen from the outside.
Support
A good solid tripod is essential, it doesn't matter what type - just so long as it offers a good steady support. Ideally the tripod feet should stick into the ground to minimise movement; if you have duckboards on the ground ensure the tripod feet are not on the duckboard otherwise the tripod will move when you do. The choice of tripod head is critical. I have used a number of different types - ball and socket, pan and tilt fluid head and my favourite is the Mongoose Gimbal head.
To some extent the choice of tripod head will be governed by the lens you intend to use; I would not recommend, for example, using a 500mm telephoto on a ball and socket head as the lens may flop over (does not apply to certain more recent designs, eg Arca Swiss). I tend to use the head in a position where it is only partly locked, so that I can realign a shot readily, without resorting to tightening and slackening the controls. In public hides I generally find bean bags are much more suitable than tripods. The height of the tripod is really critical and it is worthwhile taking time to ensure you get the optimal height and direction. I will come back to this point a little later.
The lens is of course one of the most important items to consider; once again the hide provides some flexibility for the photographer, in general terms lenses of between 300mm to 500mm will prove adequate. At this point the photographer will need to consider the focal length and also the subject as both are inextricably linked.
Garden birds such as robins, finches, sparrows and tits are fairly small, wrens and goldcrests are tiny, thrushes, magpies, pigeons and jays are relatively large - this has an enormous impact on the image size, the larger birds are perhaps 20 times larger than the smaller ones. It is for this reason I sometimes use two cameras in the hide, one has the 500mm lens whilst the other has a 100-400mm zoom attached. This offers the flexibility of capturing small passerines (perching birds) and the larger ones such as pheasants and jays, etc.
The lenses in the 100-300mm focal length may be considered though the hide will have to be proportionally closer to the bird, this may be the only practical option on limited funds. It must also be borne in mind that the depth of field with a shorter lens will be the same as that for a longer lens provided the image magnification and aperture are the same. The downside with a shorter lens is that even though the depth of field is the same, it does not actually appear so - it appears to be greater.
With longer lenses, the angle of view to the background results in a more diffused appearance and the eye perceives the depth of field to be less even though it isn't. In other words, the longer lenses produce the soft, silky background more readily than shorter lenses.
A little discussion on apertures is worthwhile at this point. Expensive 300mm/f2.8 or 400mm/f2.8 lenses will offer lightening focus speeds. This facility is a requirement in sports photography due also to the possibly low-light conditions of floodlit games. In bird photography the action is also fast but when photographing fairly close-up subjects, depth of field is very limited - even at f8, consequently the wide aperture becomes surplus to requirements.
The old maxim of 'f8 and be there' is not a bad guideline to bear in mind when photographing garden birds, though the light available this winter has not proven too amenable. Image stabilisation is preferable, you will no doubt find different photographers have their preferences and some do not to use it when the camera is tripod mounted, even if they have the choice. I use Canon lenses and I use IS on the setting 11 - this applies to the 500mm and the 100-400L; I use this setting almost all the time, regardless of tripod-mounted circumstances.
Camera Bodies
Choice of camera body is also influential in terms of image quality. Frequently medium to high ISO speeds will be needed as shutter speeds will need to be in the region of 1/320 sec (or faster) so a camera body producing minimal noise would be advantageous and perhaps full-frame cameras would produce superior results.
Having said that, I do not think you would need to die in a ditch over this issue; if I had a 5D Mk 11 I would use it for hide photography - but it would be of less use when photographing away from the hide pursuing birds in flight for example. I currently use a Canon 50D (1.6x crop) and, provided the image is well exposed, I do not have too much trouble with noise. When taking images I tend to shoot in bursts of two frames, to ensure one image at least is sharp and if I sense the bird is about to move (not easy!) I would consider a longer burst in order to catch some action.
I do not use filters for bird photography - but I do use camera batteries! I have a twin battery pack in the camera and when using a 500mm lens they can be drained in a couple of days - it is surprising, if there is a lot of activity, just how much battery power you may use. The golden rule is always have spare batteries with you and of course have spare memory cards. As a rough guideline if you have a productive day you will need 8-12GB of card capacity.
As a guideline you will need to place the hide approximately 2.5m - 5.5m from the subject when photographing small birds using 300mm to 500mm lenses. This will provide a fairly close-up image with sufficient background space. The lens will protrude from the hide so ideally keep this to a minimum so that it will be less apparent when you move the lens from one position to another. If the lens is black, there is little need for camouflage although it is no bad thing to have because it also protects the lens from knocks. If your lens is one of the white, Canon L series I would definitely recommend camouflage material. They may be bought 'readymade' for the lens or you could make something up yourself from camouflage material.
Food and Bait
Food attracts birds to the vicinity of the hide. This is a process that should be planned and prepared for over a period of time. You also owe it to the birds not to suddenly remove their food source once they have become accustomed to visiting your garden. A general, mixed bird food (including sunflower seeds) and suited to feeders, will attract finches, robins, tits and sparrows. Peanuts will be attractive to tits and nuthatches; suet and mealworms will attract dunnocks, blackbirds and robins. Certain birds will be happy to perch on a branch, others will be happier on a more substantial bough or a log. Others will much prefer to be at ground level - eg dunnocks, chaffinches, blackbirds and other thrushes.
Once you have put up feeders you will very quickly appreciate what species are coming and you will be able to position and vary food supplies accordingly. Don't expect instant success, it may take a day or two for the local birds to find the feeders - you may have competition, your neighbours may already be putting food out but don't worry the birds will arrive shortly, especially if you are providing something the neighbours are not providing.
Bird food is widely available from the RSPB and specialist seed suppliers and from local pet shops and supermarkets - as with most things it pays to look around, prices vary considerably. The main guideline is if it is very cheap compared to anything else it probably is not good, the seeds will not be favoured by small garden birds.
The food and the perch need to be sited with great care. Position food near to the perch, so that the birds will land on the perch, as opposed to landing on the food, or feeder, directly. The perch should be positioned so that there is a suitable, muted background.
This cannot be overstressed, if the background is distracting it remains so on every image - manipulation in Photoshop is possible but it is by far preferable to get the background correct on location. When you are close to actually taking photographs it is worthwhile sitting in the hide and checking, with the camera, that the perches are optimally positioned, that food is nearby and that the perches are not positioned in such a manner that next door's cat can readily ambush your subjects. Take time to observe - are the birds coming from where you imagined? - do you need to reposition? - is the light coming from the right direction - is the image large enough in the frame? etc.
Take a photograph of the perch and really examine the perch and backgr und. I make no apology here - I have repeatedly mentioned the background - it is essential to ensure it is neutral and muted!

The colour and tonality of the background is extremely important and it is well worthwhile trying the camera and lens combination in different potential areas before deciding where to make the final set-up. These guidelines will also help for routine exposure settings; in bright sun, for example, I would set the camera to Evaluative/ Matrix metering and to under-expose by half or 2/3 of a stop to ensure the highlights in the bird's plumage do not burn out. Ideally the out-of-focus background should be fairly neutral in terms of hue, but any residual colours should be complimentary to the bird and, if possible, the perch.
This can be generally achieved by ensuring the perch is about 3m or more in front of anything else when the lens aperture is between f4 and f8. If you do not have sufficient distance behind your perch to produce a muted background I found that camouflage material pinned, back-to-front (to ensure there was not an obvious repeating pattern), on a garden fence, gave very acceptable results.
The Perch
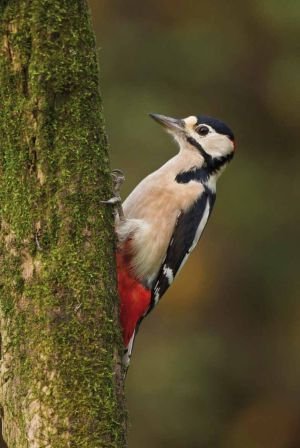
The choice of perch is very influential in making a pleasing image; a small bird on a massive bough will look lost and dominated by the perch, small birds look more natural and you will see more detail if the bird is on a finer perch. Rotate a variety of perches, otherwise all your images will look too similar. Some may have thorns, others dark leaves; others may have pale leaves, or buds or none at all; some may have lichens or mosses or catkins - let your imagination run wild. If you are interested in woodpeckers you may consider drilling holes in an old log and placing peanuts there; if you place the holes on different sides of the log you can place peanuts in one side or the other, in accordance with direction of the sun.
The next thing to consider is the height and angle of the perch. It needs to be at lens' height and angled so that you get a good view of the bird. A good view may be lateral or indeed from the back, providing the bird turns its head toward the camera. If the view is to the side of the bird try to get the shot when the bird has a slight head turn towards the lens, and ideally when there is a catch-light in the eye.
As mentioned previously, fairly direct light, but slightly diffused, would be optimal for bringing out plumage detail. For 95% of the time I try to ensure that I focus on the bird's eye or cheek. If the eye is not sharp then you can pretty well consider disposing of the image. I try to use the slowest ISO that would permit 1/320 sec (or faster), then I consider aperture secondarily to shutter speed. It is good to get a sharp image with relatively small depth of field compared to a blurred image with good depth of field.
It is not very often that we actually see birds, close up, for long enough to simultaneously appreciate the full detail from bill to tail, so the human eye is capable of accepting less than full focus on all parts of the bird. That said, in general, the more there is in focus, the better.
Choice of AF point in the camera is a personal issue, I generally use the top central point as this offers good compositional choice, you may prefer to use a different point. Alternatively you may set your camera to use a combination or cluster - this is fine provided you cover the all-important eye of the bird. Another approach is to use 'focus lock and recompose' - though this can be frustrating with small birds as they are usually moving, rather than remaining static. For this reason I prefer to use servo-focus as opposed to single-shot focus - even though the bird may be perched in one place, the head is always moving slightly.
The Images
This may sound a little obvious but I will mention it because I have been caught out several times - check your camera settings. On prosumer Canon models it is so easy to knock the dial - you may think you left the camera on AV mode when in fact it is not. I was once puzzled for a few minutes when I wanted to capture a shot of a lesser redpoll - it would have been a 'lifer' at the time and I missed the shot. My camera was in fact set on one of the custom modes and when I looked in the viewfinder I thought I was on Av and auto focus. I pressed the shutter and nothing happened; also the camera kept resetting the ISO and it took me a few moments to work out what was going on.
The lesson here is to have a small torch (I now have a tiny one on my key ring) and look at the camera dials and don't just look at the LED screen because you can be easily misled.
Now we come to the images themselves; bird images taken from hides are sometimes rather dismissively referred to as a 'BOAS' - bird on a stick. I can have some sympathy with this viewpoint if indeed, that is exactly what it is. With a little care and attention you make that a well-exposed sharp image of a bird actually doing something whilst it is on an interesting perch in front of a pleasant background - here I think we have a different scenario.
How do we get there? Initially I suggest you take simple portraits - ensure the technical details such as focus and exposure, etc are correct and you instinctively know when to under-expose one bird by 1/3 and another by 2/3, etc. I set my camera to show the histogram for 4 sec - this tends to remind me to check it!
It also serves to remind me to check the shutter speed is adequate and if necessary increase/ decrease the ISO setting. Observe the subjects; you will begin to recognise potential posture changes, look for interaction with other birds. You can also vary the position of the feeder with the perch so that there is a distance through which you are confident they will fly. Here you can manually focus and as soon as the bird shows signs of moving, using the cable release, fire the shutter to get in-flight shots. To ensure you get the birds to the correct spot in the first place you may need to make only one, ideally located feeder available in front of the hide.
The feeder may have several apertures for the birds to feed from - tape them up when in the hide, leaving one vacant aperture by the perch, this will cause the birds to queue up for you and maximise opportunities. The advantage of multiple feeders is that you get plenty of opportunities, but the chances are that you focused on the wrong perch, so once again work with nature as opposed to fighting it and you will get the results - of that I am certain.
Fill-in flash
The judicious use of fill-in flash can prove very beneficial. If there is too much fill-in in the image, the use of flash will be very obvious, not enough fill-in will provide no benefit other than possibly a small catch-light in the eye, so fill-in has to be optimal. If you are going to try fill-in flash, I would suggest you mount the flash-gun on a tripod outside the hide and ensure correct alignment to the perch, I would also take a test image and check the exposure to ensure that lichens on a branch for example are not burning out. A question I am sometimes asked is, 'Does the flash scare the birds away?'
The answer is most birds are usually unafraid though occasionally a couple of flashes are required before the bird accepts the flash. I think the point in question is that if the birds are clearly unsettled then don't use the flash; if they are accepting of the flash then use it when required. In strong light or oblique light darker plumage may lack detail or may prove noisy; fill-in flash can be used to render detail in darker plumage whilst not burning out the paler areas. Trial and error will determine optimal settings but I find that a fill-in setting of -12/3 EV is a good starting point.
You may need to check either camera or flash-gun settings to ensure correct flash synchronisation speeds as you will still require a fairly fast shutter speed; I place my flash-gun on 'High Speed Sync' and set the camera to override the flash gun settings and provide -12/3 fill-in. Your flashgun batteries may not be able to keep up with the camera if you are using a fast drive setting so this scenario may entail the purchase of a battery pack - this is a luxury I have not pursued to date.

Reflectors
Reflectors can prove beneficial when the sun has moved to a less than optimal position; light may be reflected back onto your subject and this would minimise the need for fill-in flash and possibly extra battery packs. A large white reflector as opposed to a golden one would be best and positioned to provide the required lighting from the greatest distance possible.
This would help diffuse the light and minimise the chances of birds fouling the reflector. The reflector would have to be firmly anchored as a sudden breeze would soon cause misalignment.
Back lighting
Occasionally backlighting can provide unusual images, offering beautiful silhouettes or partial silhouettes with fine feather detail in the wing tips. This may be provided by natural light or by the use of flash.
In circumstances such as this it is a good idea to plan the scene in advance; you may for example set-up a darker background and note which birds squabble at the feeder and where - you could, for example, place the feeder and perch at a distance in and anticipate a mid-air squabble, your camera set manually to capture any potential action.
The points I have covered will place you in good stead to make a start on capturing some images of garden birds. As time goes on you will soon appreciate that a slight angle change this way or that way of the perch will produce a better view of your subject. You will soon understand where the best places are to place your feeders. You will know that bird photography requires patience and the sheer unpredictable nature of bird behaviour will provide you with endless opportunities.
It is up to you to vary those perches and place them in different places to get a variety of images. It is you who can check your camera settings and who can check that histogram - it is you in control of your equipment working in harmony with nature - hey, it is you having R&R but always remember the needs of the subject are paramount to yours as a photographer. Good luck and have fun.

B.P.P.A. LIMITED
The Society of International Nature and Wildlife Photographers (SINWP)
Clwyd Chambers, Clwyd Street, Rhyl, Denbighshire, LL18 3LA, UK
Company Reg 0392 2894 | VAT number 790 4289 05
Tel: 01745 356935
Corporate Partners


Newsletter: Subscribe here
SINWP Bird Photographer of the Year
London Photography & Video Show - Europe's Largest 'All-Welcome' Photographic Convention | Partner Societies | Privacy