

articles/Infrared/DIY-Infrared-Conversion
DIY Infrared Conversion
by Thomas Lee
HEALTH WARNING! Screwdrivers can kill your camera DEAD.
The Quandary
It seems only yesterday (actually it was March 2012), that I was raving about the Hybrid V1 small sensor offering from Nikon and the superb results I was getting from such a portable and inconspicuous device.
How times have changed...
Don't get me wrong, I love the results but having used the camera for nearly two years, there are certain features of it that were beginning to wear thin on me - such as the inability to turn off the motion sensor located next to the viewfinder. It was only supposed to work when the eye was close to the viewfinder, however, mine seemed to turn the viewing screen off as soon as you picked the camera up. A bit of a nuisance if you were trying to video something!
My next thought was to trade in for a new camera whilst it still had some value attached to it...eeek! To my horror Nikon had slashed the cost of a new unit to less than one third of its original selling price. This is not good news for a trade-in deal or to buyers (like myself) who jumped in on the new technology that is now just over 24 months old. Such a quandary, what to do? I was going to get maybe £100 against a new camera that might do exactly the same thing.
I have long been a fan of infrared photography and indeed already have a converted Nikon D70s precisely to do this job. However, when I travel abroad, I need to carry so much gear that baggage allowances play a part in what I take, and another SLR body and lenses can add to difficult decisions. There is also a problem with flare depending on the lens choice with the D70s.
I therefore looked into the possibility of converting the Nikon V1 to solve all of these problems. To my surprise, finding the information on the web was quite easy and the instructions for undertaking the conversion were so straightforward that I decided to do the job myself.
IR Conversion
The first stage was to bookmark the instructions from the website detailing the conversion... http://nikongear.com/live/index.php/topic/46637-nikon-v1-ir-conversion/ and then to source the relevant filter for the job. In my naivety I only thought there was one filter, however, there are several choices and I decided to go for the 850nm glass filter from Kolarivision http://www.kolarivision.com/filterchoices.html. This is a completely neutral IR filter for true monochromatic work. There are some very helpful tutorials on the site also. The filter retails at $99 (around £72) but I did get a shock when the Post Office sent me an invoice for an additional £22 import duty and handling charge!
Before you tackle a job like this it's always worth noting that once you touch anything inside the camera all bets are off when it comes to warranty or sending things back to the manufacturer - so be careful, read the instructions several times before attempting to remove any screws on the camera, and make sure you have a clean environment and are methodical in your approach. Don't try to butcher the conversion by making do.
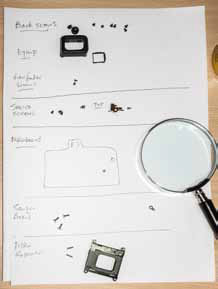
In my case I only needed a set of jeweller's screwdrivers, canned air and a clean, well-lit desk. When removing screws, to keep track of them, used a 'site map' by drawing on a white sheet of paper and labelling where the screws came from. They may look the same but you'll soon find out that they're not. Use the correct screwdriver. You'll find that the cameras are well built and although the screws are tight, they can be removed when the correct tools are used. Mine were removed with a Phillips 00 size, which is quite small and it was difficult to get a decent purchase, but not impossible.
The instructions for my camera conversion were very well written and supported by photographs, but it's worth taking your own at every stage of the strip down, you never know when you will need them...I had to remove the eyecup for example, because two of the back retaining screws were 'hidden'.
After removing the eyecup, all the screws holding the back could be put to one side and the back eased away, revealing the metal shield protection to the main circuit board. Various screws and ribbon cables were eased away being careful not to damage any of the fine connections. When the circuit board was lifted, the sensor board could be removed and worked on away from the main body. Keep everything clean with the air duster and try not to touch any of the surfaces with your fingers.
Dealing with the sensor board is the tricky bit. Mess this bit up and you're left with a small pile of expensive scrap! The dust shaker is resistant to infra red and not required during reassembly, so was removed and put to one side. The light-blue, colour filter was removed using a flat jeweller's screwdriver. This is glued into place onto a rubber mount and was the only bit that really scared me as it made a bit of a scrunch when it came away.
The blue filter is discarded and the sensor cleaned very carefully with the air duster to make sure no contaminants had fallen onto it when removing the blue filter and dust shaker. The IR filter was then placed back on the rubber mount but I didn't use any extra glue to secure it. The metal clip that held the dust shaker makes sure that the new filter stays in place. Reassembly is simply the reverse procedure of the strip-down.
Results
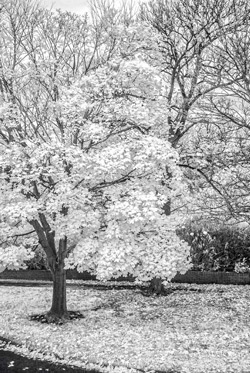
Part of the fun of IR photography is finding out how to operate the camera in a new way, so I'm not going to labour the finer details of IR methodology here, but you'll get better results by using the camera in full manual mode and ignoring what the inbuilt exposure meter tells you. Change your white balance to around 2,000K or better still take a custom balance from some green grass or foliage. Lastly you will need to remove a pink cast by desaturating (for true monochromatic conversion) when post processing. The rest I leave up to you, but the first set of images from my new conversion show great promise and I still have my original camera for a little less than a £100 outlay.

B.P.P.A. LIMITED
The Society of International Nature and Wildlife Photographers (SINWP)
Clwyd Chambers, Clwyd Street, Rhyl, Denbighshire, LL18 3LA, UK
Company Reg 0392 2894 | VAT number 790 4289 05
Tel: 01745 356935
Corporate Partners


Newsletter: Subscribe here
SINWP Bird Photographer of the Year
London Photography & Video Show - Europe's Largest 'All-Welcome' Photographic Convention | Partner Societies | Privacy